
![]()

|
|
Step 12 - Fretting
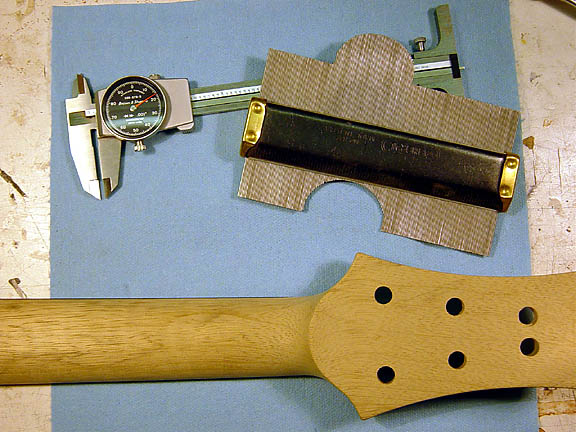 |
The neck is
final shaped and rolled into the fingerboard using a series of scrapers, rasps, spindle
sanding and hand sanding. A contour gauge and dial calipers (shown) are used to ensure the
neck carve is with in spec. At this time the fingerboard radius receives a final truing and is ready for frets. The next step is one of those details that "takes it up a notch". Each fret end, prior to fretting, has a small piece of matching wood glued into each end. That's 44 individual pieces of rosewood that fill the ends of each fret slot. Time consuming to say the least, but a nice touch that not many builders do. |
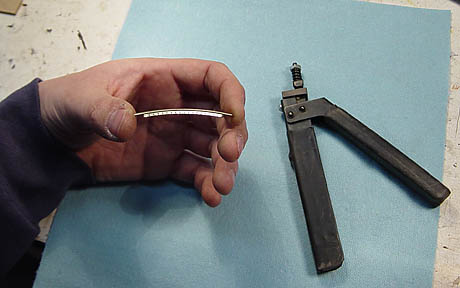 |
A quick
description of fretwire and it's parts. The domed portion of the wire that is visible is
called the bead or crown. The portion that is inserted into the slot is called the tang.
The tang has a series of raised diamonds on each side called barbs or studs that
"bite" into the sides of the fretslot. In the image above you see a single piece of fretwire that is rolled to a radius and the tang is undercut. This undercut sits between the little pieces of rosewood plugging the ends of each slot. A nipping tool (shown above) is used to undercut the tang then a file cleans up any remaining part of the tang from the underside of the bead. The fretwire is pre-rolled into a slightly tighter radius than the board. For example, if the fingerboard has a 10" radius, I'll roll the fretwire into a 9" radius. There is a couple reasons for this that might be difficult to explain without a drawing or two. Basically, as the over-rolled fret is pressed into the slot the tang is forced in a downward direction. The ends of the fret contact the fingerboard first and stop. As the center flattens down the fret ends begin being driven outwards towards the edge of the fingerboard. By doing this, the barbs are driven down and then outwards making it very difficult for the fretwire to ever pop out. For
pressing the frets into the neck I'll use two tools. One is "Jaws". This is a
modified set of large vicegrips that Stew-Mac sells. You see it has a floating neck
support along with interchangeable radius cauls to match the fingerboard. |
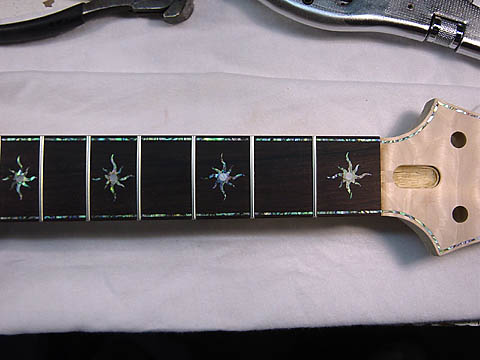 |
Once all the
frets are seated the overhanging ends are nipped off and a slight 5 deg. angle is filed
down. This is not the final angle nor is the fret job finished. All other operations are
done after the neck has been painted. I will explain why when we get there...it will be easier to understand with pictures. |
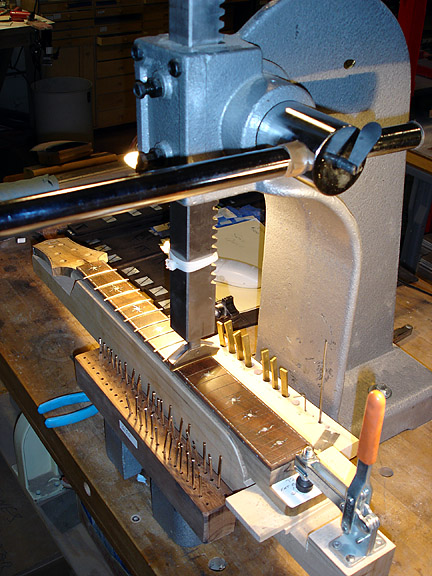 |
The tool nerd
side of me is showing again. To the left is SteveK's neck mid fret job. I've been using a
combination of a small press and Stew-Mac "Jaws" for ever now...it was time for
an upgrade: This is a 3-ton press with a full support caul that slides on a linear rail. The caul is machined to match the back of the neck and the transition to the heel, so it is dedicated for Thorn necks only...no Fenders in this bad boy . This is the 5th fret job in 2 days, I just love it and can't stop. The press is so large and the linear slide travel so long that I can leave the neck in there for all operations - no more taking the neck out - pre seating the fret - repositioning the neck under the caul - press, repeat. I true the board then clamp it into the press...once. It doesn't come out until all the frets are in. The fret tang is the barbed portion of the fretwire that is pressed into the fret slot. On a non-bound neck, such as a Fender, you can see the end of the tang on each side of the neck. On Thorn necks I use the JDJ patented "hidden fret ends". That means the fret slot doesn't extend to the edge of the fretboard. Each slot stops .040 (1mm) short of the edge. This not only looks super cool, but also prevents "fret-end" pop when the fretboard experiences seasonal change. When looking at the side of the fretboard you can't see the tangs or the slot...just clean wood and the end of the fret's crown. I don't know of anyone else using this method right now...anyone? But, since the fret slot doesn't extend all the way, each fret tang has to be under cut on each end. This is a common practice when fretting a neck with binding. Stew-Mac sells a fret tang nipper that does a decent job at undercutting the tang. I made a dummy fretboard, with oversized slots, that I use as a jig where I insert the fret wire and mark where to undercut the tangs for each corresponding fret. They are undercut to the marks and then placed in order in a numbered block holder - as seen in front of the press. For a super clean look, the little bit of tang that the nipper leaves behind is usually filed off. This is a tedious task to do by hand and brutally painful on your fingers. I designed and built a little machine that grinds this tang remnant off perfectly on every fret...it doesn't even look like there ever was a tang. I am keeping this "tang grinder" to myself for now...otherwise it will suddenly appear in the upcoming Stew-Mac catalog! |
| Go to Step 11 page | Thorn #030 Completed |